Translate

Friday, December 18, 2015

Hard at Work on the Boathouse

I know, I know...a month since my last update. Rest assured that I have been making good use of what spare time I do have, since I do need to get this done by the deadline!

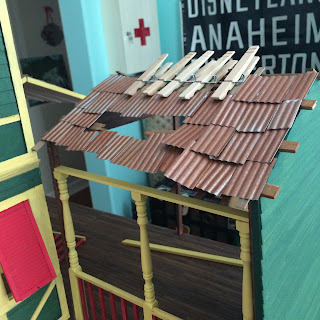
First up: making a caved-in section of roof with a lot of deferred maintenance. (I will NOT be miniaturizing the animatronic snake that I seem to recall hanging from the rafters back in the mid-'90s.)


Back view of the roof construction. Since the rafters are visible in this part of the boathouse in real life, a solid roof wouldn't do here.


Close-up, shot from below.


Staging furniture and props in one of the tower rooms. Have I mentioned that the shutters really work? (I won't be opening and closing them much - it was very difficult to install these, so I don't want to risk them popping out of place.)


Under the new roof section.


This is a Fastpass distribution space in real life, so I'm re-purposing it as a cargo storage room. I made the crates from wooden blocks and strip wood.


Oh my - what could this be? More details to come...


Monday, November 16, 2015

Paris


Je suis française (et américaine). Je n'ai pas peur.

Sunday, November 1, 2015

Not-So-Little Boathouse News

They're at it again...Van Eaton Galleries is having another Disneyland auction.

Just like last year, there are so many great things in the auction catalogue, but if you're reading this blog for the Jungle Cruise boathouse updates, pages 194-195 are well worth a glance.

The Disneyland Hotel installed the Safari Adventure remote control boats in 1999. It closed in 2010 due to extensive renovation of the hotel property. I still fondly remember getting lost at Downtown Disney with a friend, accidentally walking into the hotel's pool area, and stumbling upon a sparkling pond with tiny jungle boats. We looked at each other, wordlessly started digging in our wallets, and immediately used up a week's worth of laundry money playing with those boats. Ahh, good times.

Anyway...the Safari Adventure prop boathouse is going to be part of the auction. Also available: the "burning" boat (which would "catch fire" if you steered your boat to a certain spot), the fire department raft (the "burning" boat would be extinguished by a tiny elephant), and one of the original remote control boats.

These items are just begging to be installed in and around a Disney fanatic's backyard koi pond. Alas, they are far beyond my budget (the lower estimate for the boathouse is about 20 times my budget), I definitely do not have enough space (the SA boathouse is mounted on a 7-foot-long, 4-foot-wide base), and I don't have enough mechanical know-how to make them operational again.

So, work continues on my considerably more modest version of the boathouse.

Carved posts and delicate railings are slowly being installed. NOW this looks like a late-Victorian-era structure! I need to make more shutters, but the 6 that have already been installed really work.

View from the back. Remember, that tower wall with the door on it comes off for access to the interior rooms. (The real-life door is a much plainer style and next to a window, but I had to shrink the tower down too much to do both. With so much of the tower visible, I also thought it made more sense to make the door stylistically more consistent with the other walls.)


Two room interiors to finish. Then the hard part begins: removable railings, a (hopefully) removable infirmary, a caved-in roof, and a canopy over the stairwell. I've certainly got my work cut out for me!

Saturday, October 31, 2015

Happy Halloween!


This room box really hasn't changed since the last time I posted it (except for the Jack and Sally figures on the mantel), but I thought it would be more fun than the next boathouse update (which is coming later this weekend).

Stay tuned...

Sunday, September 13, 2015

Quick vignette

A friend asked about my progress on the boathouse, so I threw together a quick vignette in the first sort-of-finished interior room.

I still have to install the window shutters (and make the removable roof for the ticket office), but I think you'll get the idea. (The "view" is a rendering of the Indiana Jones Adventure - which is next to the boathouse in real life - from my D23 calendar. I didn't have any good pictures of Adventureland on hand.)


Sunday, August 23, 2015

Testing, Testing...

I'm hard at work on interior walls for the boathouse, but as it takes a long time for glue and paint to dry, I've been making the most of it by working on the beach bungalow at the same time.

Regular readers may recall I scratch-made my own retro figural lamps. I decided it was time to install them.

These lights aren't hard-wired (I'm never hard-wiring a house again; it's just too problematic when a light mysteriously stops working) - instead, they will run on batteries concealed outside the house in trash and recycling bins.


They work! :)

Thursday, July 16, 2015

Rusty Roof

The exact location of the Jungle Cruise boathouse is somewhat vague (the Jungle Cruise itself carries guests through scenes from Cambodia, India, Africa, and the Amazon rainforest), but jungles are wet, humid places.

The boathouse, as one might expect of a building that is supposed to have stood in a steamy jungle since 1911, has a rusty corrugated tin roof.

I used plastic tin roof sheeting, mostly for safety reasons (two more roof sections will have to be added later). I had aluminum paint on hand, so I gave the shingles two coats to make the plastic look more convincing.

Then, it was time to add some rust. I'd heard good things about Dr. Ben's Scale Consortium, a line of realistic tints, stains, and pigments created for model railroads. Since so many model railroad products are plastic, I figured they would work on the plastic roofing. 

The accompanying booklet recommended dampening the surface with rubbing alcohol, then adding the solution. I tested this method but thought a random-rust-bloom look would be more realistic for 1/12 scale. So, I poured some of Dr. Ben's Realistic Rust weathering solution into an atomizer and got to work. 


Main roof section from the front. 


Tower top. I think it needs a little more rust.


Main section from the back.

The Dr. Ben's products work VERY well (I will be using a few more in other spots), but do note that they can be a little messy (tape off and cover up anything you don't want stained/weathered) and can be tricky to clean up. There are some rather messy stains in a spot that will, thankfully, be covered by flooring.

I'm working on the next task, but it's very time-consuming, so please be patient with me.

Thursday, June 25, 2015

All The Cool Dollhouses Have Removable Walls

Kidding...but I'm not the only dollhouse builder incorporating removable pieces into her current build. Brae is doing a sliding wall for Milo Valley Farm (she also put removable walls in the Aero Squadron Lounge and the Newport). Muriellisa has already built a removable wall for her miniature Petit Trianon (go look - it's absolutely gorgeous!).

While considering how to build the boathouse, I knew I'd have to make a few parts of the structure removable.

I couldn't very well leave one side of the boathouse's tower open - it wouldn't look right. So, I made one wall removable, and left the tower top removable to enable removing the back tower wall.

Now you see them...


...now you don't!


(Obviously, I haven't started the interior yet. But you get the idea.)

Muriellisa is using magnets to hold her wall in place; Brae is using channel molding. Between the tower rooftop and the adjoining middle-floor roof structure, my removable wall is staying put pretty well with tension alone (if it wasn't, I'd conceal some hooks and eyes under the tower top roofline). To my complete amazement (Brae and Muriellisa are far more skilled and talented than I am), it hasn't fallen down once.

The removable wall all by itself (still need to add more trim to the top floor). It's painted differently in real life (and there is a window next to the door), but as this is a dollhouse, I didn't think it would look quite right if the design didn't match the rest of the tower.


Another part of the boathouse also called for a removable piece: the ticket office. Stuck onto the front of the boathouse next to the entry, the ticket office is supposed to be accessible through a door inside the boathouse queue (the door is locked to keep guests from tampering with the props, but you can look inside). I couldn't very well make the wall removable; it's a load-bearing wall holding up the middle floor. So instead, the ticket office will have a removable roof.

I've cut the piece for the roof, but haven't gotten around to thatching it yet. This picture should give you a pretty good idea of how I will be accessing the interior.


As always, more to come.

Tuesday, June 2, 2015

Roofing

I'm sure you all know roofing a dollhouse is a lot of work. This one has its own unique challenges.

In real life, the boathouse roof is made of corrugated metal shingles (perhaps the skippers had to make do with scrap pieces saved from various sources?). I wanted to use real metal (so I could get it to rust realistically), but realized it would be a good way to repeatedly cut my fingers. So I bought corrugated plastic roofing, have been cutting it into shingles (thankfully, it can be cut easily with scissors), and have some ideas for making it all look like rusty old metal.

Here, you can see back and front views of the main roof section and the tower top being shingled. (The tower top is removable because the tower's back wall is also removable, which I'll discuss in further detail in a later post. If I attached the tower top, its overhang would prevent removing the wall.) 


Two other sections of roof, which I haven't started yet, are going to be quite a bit more complicated.

Saturday, May 23, 2015

How To Build a Dollhouse in a Week

I must be completely insane.

In the midst of building the Jungle Cruise boathouse (and still decorating the bungalow!), I built ANOTHER dollhouse.

This one isn't for my collection, I built it as a Mother's Day surprise for my mom.

The seed was planted last year when my mom fell in love with L'Artisan des Glaces, an ice cream and sorbet shop in EPCOT's France pavilion (most of my French ancestry comes from her). Then, upon finding a dollhouse she'd started building for herself (and never finished), she made an offhand comment that she'd love it if someone else built her a dollhouse so she could get to the fun part - decorating it.

Challenge accepted.

I couldn't just start building her a house - Mom comes over a lot, and I didn't want her to stumble upon the surprise. So I waited for her to go out of town for a week.

Before she left, I designed the house, cut the plywood, and hid the pieces in a closet.

Mom doesn't have room for a big dollhouse, and isn't as concerned with realism as I am. So, although this was largely inspired by a real building (the actual ice cream parlor is rather large and has a shingled roof), I designed it to have a small enough footprint to fit on a shelf or side table (8" deep, 16" wide, 24" high).

Simple houses are the simplest to put together. Case in point: this house has one room per floor and no stairs (I also eliminated the attic window found on the real building, as it would have been very difficult and time-consuming to build).

With the house mapped out in my head and on paper, and with the pieces ready to go, I started building the shell as soon as Mom left on her trip.

I also wrote up a schedule for building the house, taking into account my work schedule and times of day when hammering might annoy my neighbors or when I wouldn't be able to spray-paint outside. Day 1, build the shell and paint the outside trim after dinner. Day 2, build the big triple window after work and paint it just before bed. Day 3, stucco and paint the exterior after work. Etc.

I am happy to report that I was able to stick to the schedule, although it did rain at one point and I had to rush to finish spray sealing the house before it got wet!

I opted to finish only the ground floor, leaving the upper two rooms "as is" so Mom could choose the decor herself (I'll install interior walls, ceilings, and flooring when she's decided what she wants).

On the last day, just as her plane landed, I hid the finished house in the closet and managed to keep it a secret (Mother's Day was a month away).


This is what my mom found waiting for her on Mother's Day, and I'm happy to report that she loves her new French dollhouse. She's even having me help her finish the dollhouse she started building two years ago (my work table has never been messier or more crowded, as I currently have this house, her cottage, and the boathouse on it).

Saturday, May 2, 2015

Disneyland. Jungle Cruise. Gotta do it.

Like a lot of Southern Californians, I have been to Disneyland many, many times. One of my favorite places in the park is the Jungle Cruise queue, built to resemble a ramshackle outpost/boathouse in an exotic jungle (full story here).


To me, the boathouse has always felt like walking through a life-size dollhouse. From front to back, it isn't that deep (Disneyland's Adventureland is rather small due to its age and placement, so the current boathouse was built to fit a certain footprint, and the two-story design keeps the queue from blocking the already-congested walkway outside on busy days). The windows, for the most part, don't have glass in them but do have shutters. The back of the boathouse (which faces the jungle and is where the boats load) is largely open (for obvious reasons, there are railings). There are doorways with no doors, the fruit is definitely plastic (ironically, there are a couple of live birds in cages if you know where to look), and the crew have re-purposed items in pretty much the same way that children re-purpose small items as dollhouse furniture.

Jungle Cruise skippers are notoriously witty (some of them are brilliant comedians), and many of them like to start off the eight-minute voyage by asking for a show of hands: "How many of you woke up this morning and said 'Disneyland. Jungle Cruise. Gotta do it'?"

Last summer, I did exactly that. Instead of going there in person, I decided my next build was going to be a dollhouse version of the Jungle Cruise boathouse. 

Obviously, I have a LONG way to go on this build. But, with the outside painted, it's at least somewhat recognizable.

I hasten to add (for the benefit of Disney purists) that this is NOT an exact copy. If it were, the base would be too big to fit on my work table, the additional materials required would blow the budget, and due to the unique structural challenges of building in miniature, certain areas of the boathouse wouldn't be stable. Add to that the fact that I am not a carpenter in the first place, and in a nutshell, I have to take some liberties (which I'll detail in a future post). I'm aiming for the overall feel of the boathouse, not perfection.

Expect progress to be slow - I'm going to have to make the shutters, some of the railings, and most of the props myself. And although I didn't include the adjoining Tropical Imports shop, I've left enough space to build it later (I'm still not sure I will, since the merchandise consists mostly of bottled drinks, packaged snacks, and rubber snakes...).

P.S. There was an auction of vintage Disneyland items in Los Angeles a couple of months ago. I wasn't able to attend, but was thrilled to see that the very first item listed in the auction catalog (see page 13) was one of the miniature potbellied stoves Walt Disney made and hand-painted himself (if you've missed certain previous posts, Walt collected, and occasionally made, miniatures).

Wednesday, April 15, 2015

Progress

The mystery project's shell is built and I'm hard at work at the exterior. Here's a "work in progress" shot for you:


To answer your guesses on the last post....it's not a church, fire station, or hotel. It's something most of you have never seen before (and I had to tweak the design considerably to keep this project a semi-manageable size). Keep in mind that many identifying details are not yet in place.

I plan to reveal what this unusual structure is in the next couple of weeks. But, feel free to keep guessing!

Monday, March 30, 2015

Can You Guess What This Is?

Please don't think I've been neglecting the bungalow...I'm still working on things for the interior (as well as sorting out ideas for two exterior structures). But I couldn't resist starting another build - one I've been planning for the past year (yes, while still working on the bungalow...).

This is a cardboard mockup of the structure, and I've had to leave a lot of identifying details out for that reason. Would anyone like to guess what it's supposed to be?


Saturday, March 7, 2015

Fun little roof details

Ilona's recent post reminded me that I haven't yet shared this picture.

The bungalow is meant to be a family home near a beach. It's based on a real-life house in an area where young families fly kites, toss Frisbees, and generally spend much of their spare time playing outside. 

I couldn't resist gluing a miniature kite and two miniature Frisbees to the roof. (The second Frisbee isn't in this picture because the roof is just too darn big to fit the entire thing into one picture and still show the details.)

I still smirk every time I see this stranded kite.


Friday, February 6, 2015

Realistic Poured Cement!

For a long time, I wondered how to realistically mimic poured cement in miniature. There was no way I was going to mess with actual cement mix; I'm just too clumsy.

I figured this process out as I went along, so there aren't any progress pictures, but I promise it's easier than it sounds. Pictured below: a tiny VW bus parked on my new "poured cement" driveway.


You Will Need:

Illustration board (a.k.a. mat board - use white, ivory, or gray, not black)
White glue
Paintbrush (I used a 3/4" wide artists' brush - anything smaller and it would have taken a lot longer)
Gesso
Gray paint
Utility knife
And of key importance...SAND! The finer, the better. (I live fairly close to the ocean, so I used beach sand; if you are hopelessly landlocked, toy stores that sell children's sandboxes usually sell bags of sand, too.)

Cut your illustration board to the size and shape you want. Fit it into place to make sure the sizing is right.

Coat the surface of your illustration board with a thin, even coat of white glue (use a brush). Sprinkle the sand onto the board, covering ALL of the glue. Allow to dry, and gently tap off any excess sand.

If any spots on the board didn't pick up the sand, apply a dab of glue and sprinkling of sand to the affected areas. Yes, this will create a slightly uneven surface. However, it looks exactly like old, cracked-but-repaired/unevenly poured cement if you do this. So, for a newer-looking driveway, be extra careful to cover everything in one application. For an old, repaired sidewalk, don't worry too much about it.

Dilute gesso and gray paint with water, and brush onto the sand. The color of gray paint that works best depends on what color the sand is. The sand I used was a nice medium grayish tan with black and white flecks, so a lighter, cooler gray was called for (I used Martha Stewart's craft paint in Gray Wolf). If you are using white (or light tan) sand, you may want to omit the gesso. Allow to dry, and if you are happy with the color (which will be lighter when dry), brush on a second coat. (It's a good idea to test this on small pieces of board until you get the color just right.)

Pictured below: cement walkway to concrete front porch.


Once the paint is good and dry (and you are happy with the color), seal your cement. I used two light coats of hard-finish Mod Podge.

Finally, when the sealer is dry, use the knife to score the cement where desired (you might want to change the blade when you're done). Scoring can imitate lines from cement being poured in small areas (such as with old sidewalks), or score unevenly to create cracks. If you wish, you can add dabs of paint to simulate oil drips, rust from an old car, decaying wads of gum, or moss growing in cracks.

I initially experimented with first sealing, then scoring, then painting the board (basing this process on Otterine's concrete tutorial). I quickly found it wasn't necessary, since the sand obscures the scoring and any base coat of paint. It's best to apply the sand first.

Close-up of the VW bus parked on the driveway. (I made the vanity plate by using a license plate generator, choosing the brown/yellow color scheme that was used in the 1960s rather than the white-red-blue California plates in use now. Then I took a screenshot and scaled it down.)


More to come...I still have much to do for this house.